Wednesday, March 8, 2017

Edit Canon EOS 77D 1080p footage in FCP 7/X

The Canon EOS 77D (EOS 9000D in Japan) is a midrange DSLR that sits between the Rebel T7i and EOS 80D. It features Canon's familiar 24MP CMOS sensor and uses the company's newest DIGIC 7 processor. Dual Pixel AF is built-in for responsive AF and good subject tracking in live video and movie mode and, for shooting with the optical viewfinder, there's a 45-point all cross-type system. The camera has a fully articulating 3" touchscreen LCD along with an OVF with 95% coverage. You get Full HD capture up to 60p, while the EOS 77D also sports Canon's new 5-axis image stabilization system for shooting hand-held footage.

Final Cut Pro can only import some video file may also contain any number of audio, video, and even subtitle streams. If you can't open and edit Canon EOS 77D 1080p video files on Final Cut Pro, it might be the format codec issue. To solve the problem, you need to change the Canon EOS 77D video to "a codec" that FCP X/7 can read more easily (without rendering basically). The codec is Apple ProRes, which ensures maximum editing quality and efficiency when working with Final Cut Pro.

To convert Canon EOS 77D video files to ProRes MOV, Pavtube HD Video Converter for Mac is an easy-to-use yet professional app to achieve your goal smoothly. Overall, the Canon to FCP Converter is clean and safe to install and use. And only with barely several mouse clicks, you can get the whole job done. Besides Canon EOS 77D, it can also change more Canon video file formats like Canon 5D Mark video, Canon XC15 video, to Final Cut Pro most compatible Apple ProRes .mov without any quality loss.

Now download it and follow below steps to transcode Canon EOS 77D files to Final Cut Pro X/7.

How to maker FCP 7/X accept Canon EOS 77D video on Mac?

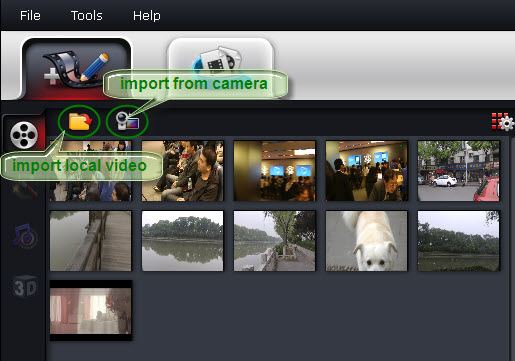
Step 1: Add Canon EOS 77D videos

Install the Final Cut Pro converter program on Mac and run it. Drag the Canon EOS 77D clips to the software. Or you can also click "Add video" button on the top of the main interface to import video to the program.

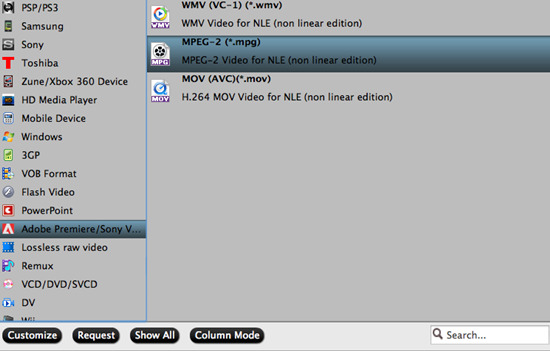
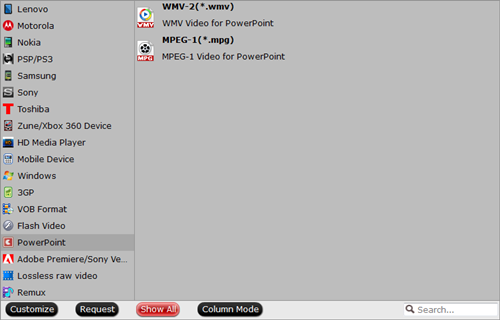
Step 2: Choose FCP compatible format

Go to "Format" bar and choose "Final Cut Pro > Apple ProRes 422 (*.mov)" as output format for Final Cut Pro X/7/6.

Tips: Adjust video, audio settings

Click the "Settings" button and customize proper video/audio parameters including Video size, bitrate and fame rate and more.

Step 3: Start Canon EOS 77D to ProRes conversion

Click the "Convert" button at the bottom right corner to start transcoding Canon EOS 77D files for FCP. It does Canon EOS 77D to FCP video conversion like a charm and the output files will maximally preserve the quality of your original Canon EOS 77D clips. After conversion, you can import converted Canon EOS 77D clips into Final Cut Pro X/7/6 to create the end results that you want.

Read More

Wednesday, March 1, 2017

Edit Canon EOS 800D/Rebel T7i MP4 files in FCP X

The Canon EOS Rebel T7i (800D in Europe, Kiss X9i in Japan) is the top-end camera in Canon's compact DSLR lineup. It features the same 24MP APS-C CMOS sensor and Dual Pixel AF system as the pricier EOS 77D and 80D, along with a 45-point all cross-type AF for shooting with the viewfinder, which is assisted by a 7650-pixel RGB+IR metering sensor. The T7i has a 3" fully articulating LCD with a touchscreen and a redesigned user interface for those not ready for a full-on DSLR experience. The camera captures 1080/60p video in MP4 format and has Wi-FI, NFC and Bluetooth.

If you want to edit Canon EOS 800D/Rebel T7i video in .mp4 for playing, sharing, you can import them to FCP X for editing. But you may can’t edit Canon EOS 800D/Rebel T7i MP4 video in FCP X due to the MP4 video codec. If you also has the same problem, you can read on to get the solution.

Donwnload a FCP X video converter for Mac

In fact the best way is transcoding Canon EOS 800D/Rebel T7i MP4 video file to FCP X editable format for smooth editing. You can adopt Pavtube Video Converter for Mac to help you done. This converter can easily convert Canon EOS 800D/Rebel T7i MP4 video to FCP X supported Apple ProRes MOV video for perfect editing on Mac. This MP4 to FCP X converter has many preset codec/formats for output, such as Apple ProRes 422/4444/LT/HQ codec.(Read review)

Besides, it can help you convert Canon EOS 800D/Rebel T7i MP4 for smoothly importing and editing in other non-linear editing systems (NLE), including Adobe Premiere Pro, Premiere Elements, After Effects, Avid Media Composer and more with preset profile for th. If you're using a PC, turn to the Windows version here which also create Apple prores code for you.

Now free download this best FCP X Video Converter for Mac

How to Convert Canon EOS 800D/Rebel T7i MP4 to FCP X supported editing-format

Note: If you are FCP X users, before you try to do the conversion, don't forget to make sure that you have installed the Apple ProRes Codec manually since the FCP X asks users to install it by themselves.

Step 1. Import Canon EOS 800D/Rebel T7i files

Launch the MP4 to FCP X converter. Here you can directly drag and drop the MP4 files to the converter, or go to Add button to load the MP4 videos.

Step 2. Choose FCP X as the output format

Click "Format" bar to choose the format for output. For editing Canon EOS 800D/Rebel T7i MP4 in Final Cut Pro X, you can choose "Format -> Editor -> Final Cut Pro X or Final Cut Pro 7"; it's best for FCP editing.

Tip: Click the Settings icon to adjust video and audio parameters on the Profile Setting as you need to get the best quality video. You can set video resolution, bitrate, frame rate (24p/30p) as you want.

Step 3. Start Canon EOS 800D/Rebel T7i to FCP X conversion on Mac

Now click the "Convert" button, and then leave the Mac MP4 encoder to do the rest automatically for you. After the MP4 to FCP Mac conversion, go to "File" > "Import" > and then you can freely use your MP4 files in FCP X (10.3).

Read More:

Wednesday, February 22, 2017

Top 6 Drone (4K/HD) Video Editing Softwares

Got one DJI Phantom 4 Pro or a DJI Mavic Pro or a Yuneec Typhoon at hand? Have recorded some wonderful 4K videos buy drone? After recording 4K video, you can edit them with popular editors for sharing on Facebook, YouTube, Instagram etc. But what video editing software is suitable for Drone video? Ok, this article shares you top 6 Drone Video Editing Softwares.

Recommend Top 6 4K Video Editing Softwares

PowerDirector

PowerDirector continues to outflank its competitors, with fastest previewing and rendering, a mass of drone 4K video editing software, though sometimes difficult to be found among so many options. Above all, After its latest update, this consumer-focused video editing software now supports editing 4K Ultra HD, H.265/HEVC, AVCHD 3D/Progressive. So whether you're willing to edit must-watch 4K movies or a simple YouTube 4k video, PowerDirector is the station where you will be satisfied.

Supporting 64 bit processor, this drone video editor tool offers fast 4k video editing. But you need to download a 6GB RAR file in case you download this 4k video editing software on your windows 7/8/10 computer. Please bear in mind that there is no Mac version in the 4k UHD video editor and rare crashes with intensive operations in the test of 4k movies editing.

GoPro Studio

Many drone pilots will probably have some experience with GoPro and the company's range of action cameras. If you do, you've probably come across GoPro Studio before. It's free to use, even if your footage has come from a non-GoPro camera, such as importing the 4K footage from drone GoPro Karma, DJI Mavic Pro, GoPro's Hero 4 Black, DJI Phantom 4 (Pro), Yuneec Typhoon H, 3DR Solo Drone Quadcopter, etc. It is also a good choice for editing drone video.

Adobe Premiere Pro CC

This video editing program supports the most imported formats. It is also a good video editor that supports 4K editing. It has both Windows and Mac versions. And it's especially convenient for Apple users, because it has iOS version on App Store which allows you to edit on your iPhone or iPad on the go.

Some users reported the slowness and crash problem. Another problem is the high price. The single program costs $19.99 per month. $29.99 for the Creative cloud complete which include Premiere Pro, After Effects, PhotoShop CS6 and more. Due to the high price, many people don't buy it, they just rent it.

Final Cut Pro X

This is the best 4K movie editing software for Mac users. It has a simple interface but it has many advanced features. It has been upgraded many times since its release in 2011. After the latest update, Final Cut Pro X now supports 4k better, including new 4k titles, transitions, and generators that can be used in 4k projects. But this Mac video editing software doesn't fit for all Mac users. Only Retina Macbook Pros with Thunderbolt 2 and New Mac Pro support 4K playback. Therefore, only users of the above mentioned hardware are recommended with it.

iMovie

iMovie is able to cut or paste transition, minor effects. It is so popular among Mac users. Really quite powerful despite it's amateurish nature. The truth is that most NLE's do about the same thing. there are minor differences between them. Most of the drone users currently are not so professional in video editing field and just need to rough edit clips and do some fades and transitions. They all do that. Where the pro apps excel is in their export options. If you are uploading to YouTube or Vimeo you will have a preset for those and all will be fine. Again, this is assuming you have a mac.

Sony Vegas Pro

One of the higher end video editing software options is the highly renowned non-linear editor (NLE) Sony Vegas Pro. Now up to version 13, this software is used by professionals and amateurs alike. Vegas Pro 13 comes with native support for 4K video, with maximum frame sizes of up to 4096 x 4096. There is native support for XAVC and XAVC S files, plus files from Red Epic and Red One. There are a number of extras and plugins included in Vegas Pro, including DVD Architect Pro. Complete support for 4K editing puts Vegas Pro at the forefront of software in this genre, while you can also edit SD, HD, 2K and 3D videos, using Sony/s intuitive drag and drop interface.

Another Useful Drone Video Software - Pavtube Video Converter for Mac/Windows

Pavtube Video Converter for Mac is not only a video converter, but also is a popular video editing software. It can easily solve “can’t import drone video into editing softwares”, “editor won’t accept the drone video” etc issues. It has the ability to convert your drone video in HD or 4K resolution to your editing software supported best editing-format like FCP X “Apple ProRes” codec .MOV video, Premiere Pro “MPEG-2” format etc. It also can compress your drone 4K video like DJI Phantom 4 4K video to 1080p video for better editing, playing, sharing etc.

What’s more, as for the 4K video editing feature, it supports you to trim 4K video duration (free set Start Time/End Time), crop 4K UHD video by moving the marquee to resize 4K video display, add subtitles/watermark to 4K video, split/merge 4K video clips and adjust 4K video parameters (Bit rate, frame rate 60/30p to 24p, aspect ratio 4:3 to 16:9 or vice versa, etc.). So powerful a drone video converter & editor, why not downloading it?

Support H.265/HEVC Encode & Decode
Convert 250+ video and audio formats in SD/HD/4K
30X faster conversion speed and high output quality
150+ ready presets for video editors, iPhone, iPad, Samsung, Game Console, VR, TV, etc.
Customize the output resolutions to any size the users want
Batch conversion and super fast conversion speed

Pavtube Video Converter for Mac

Convert video

Edit video

video converter mac editing interface

Windows user please get Pavtube Video Converter to convert drone video or edit drone video on Windows (10, 8.1, 8, 7, XP, etc).

Read More:

Thursday, February 16, 2017

Solutions for Fixing "Windows Movie Maker No Sound"

Maybe you like editing videos in Windows popular editing software - Windows Movie Maker. But somtimes you may encounter : “No sound” error. No worry, this article rounds up useful solutions for Windows Live Movie Maker no sound errors.

3 Solutions for Fixing "Windows Movie Maker No Sound"

Now that you have known the cause of your Windows Movie Maker, the next logical thing will be seeking a solution to that. A proper diagnosis of the problem will be the only sure way for getting the right solution so you must give that top priority. The following are workable solutions that you can explore anytime.

1. Click Sound in Control Panel;

2. Choose the recording device on Recording, click Properties, go to Device usage, select Use this device (enable), and click OK.

3. Open Movie Maker in Windows Start, click the Movie Maker button, and then click Options. Select Webcam, and then check to see that Available audio device is set to the device you enabled in the Control Panel in the previous step.

Choose One Windows Movie Maker Alternative to Avoid No sound Errors

If at all Windows Movie Maker has completely refused to play sound from your file, you can seek an alternative program in solving the problem. Pavtube Media Magician can be your smart choice. It is a nice camcorder assistant manager, lossless camcorder video joiner, MTS/ M2TS/ MXF/ MOV/ MKV/ TiVo/ WMV/ AVI/ MPG converter and editor, and efficient camcorder video uploader for YouTube. The smart camcorder wizard helps organize, backup and import camcorder videos with ease. And timeline-oriented editing tools help accurately trim and cut clips frame by frame. Format presets provide you the easiest way to output the right format with the best recommended settings. The output task manager also helps create multiple tasks in different formats for Andoid/iOS/Windows tablets and phones like Galaxy Tab/ Amazon Kindle Fire HD/ iPad/ AppleTV/ Microsoft Windows Surface RT, editing software such as Adobe Premiere/ Sony Vegas/ Cyberlink PowerDirector, or upload to YouTube at the same time.

Why Choose Pavtube Media Magician to Replace Windows Movie Maker?

1. It is a Professional Video Editor

2. It is also a Powerful Video Converter

Professional Video Editor - Media Magician Powerful Video Converter - Media Magician

Sort/backup/convert camcorder footages

Once you load camcorder footages to this Smart Camcorder Wizard, you can automatically detect the camcorder, sort, preview, backup and import videos with ease. Any camcorder recordings can be imported such as DJI Phantom 4 Pro, Canon 5D Mark IV, Canon XF305 MXF, Canon 60D MOV, Sony A6300 etc.

Convert camcorder videos to any formats

When edited video files on timeline, you can create multiple conversion tasks from the same source files placed on timeline. These tasks can be added, paused, and deleted any time you like. It outputs video formats like *.mpg (MPEG-2), *.mp4 (MPEG-4), *.avi, *.wmv, *.mov, *.mkv, *.m2ts and *.webm (for YouTube only).

Freely trim, join and cut video files

You can accurately trim, cut, join, split, delete, rearrange your camcorder footages by frame.

Output lossless MTS/M2TS or MKV

Load your Sony PMW-F5/F55 XAVC, Nikon S800c, Nikon D7000, Sony PMW-350 XDCAM EX MP4, and othe camcorder videos and generate lossless videos with original format or MKV

Timeline editing without rendering

Timeline bas editing panel for full control & accuracy enables you to drag video files to timeline and edit it by frame.

Directly upload camcorder videos to YouTube

Easily Set YouTube account details in time line & direct upload to YouTube automatically. That's great.

Add 3D effect to camcorder 2D videos

Easily add 3D effects to 2D videos by highlighting a clip on timeline, and go to the 3D effect tab, you can enable 3D effect to the output video. You can choose Red Blue 3D effect and Red Green 3D effect. You also can adjust 3D depth to get better 3D experience.

Convert videos to iOS/Win 8 RT/Android tablets & phones

It supports import MTS/M2TS/MXF/MOV/MKV/TiVo/AVI and output MPEG-4 videos for better playback on iPad, iPhone, Apple TV, and Android tablets like Samsung Galaxy Note, Amazon Kindle Fire HD, and Microsoft Surface Windows RT/Pro.

Add or adjust effects to contents

After you drag files to timeline, you can move cursor to Effect tab where you can instantly adjust brightness, contract, saturation, as well as add special effects like Aged Film, Simple Gauss Blur, etc.

Transcode Videos to NLE software for smooth editing

Pavtube Media Magician turn loaded footage to Avid Studio, Sony Vegas, Adobe Premiere, Adobe After Effect, Cyberlink PowerDirector, Pinnacle Sutio optimized presets.

Reduce or enlarge volume for clips

Easily adjust volume in clips no matter input has abnormal. too small or too large volume.

Save Media Library to mdat file extension for further editing

Exporting Media Library file *.mdat, the video information of the imported videos will be saved. The next time when you launch the program, or import the Media Library file, the video list will be imported in seconds.

Free download this Windows Movie Maker alternative - Windows Movie Maker

You can reference this detailed guide to learn how to use this WMM alternative.

Related Articles:


Wednesday, February 8, 2017

Import Olympus E-M1 Mark II 4K to Premiere Pro (CC 2017) for editing

Olympus' OM-D E-M1 has been one of our favorite mirrorless cameras since its introduction in 2013. It impressed us with its build quality, image quality, ridiculous amount of manual control (that's a compliment) and boatload of features. Three years later, it's still very competitive.

Key Specifications of Olympus E-M1 Mark II

  • 20MP Live MOS sensor
  • 5-axis in-body image stabilization system
  • 121-pt hybrid AF system
  • 60 fps burst shooting (18 fps with continuous AF)
  • Fully articulating 3" LCD display
  • High-res electronic viewfinder
  • Cinema (DCI) and UHD 4K video
  • 50MP High-Res Shot mode
  • Weather-sealed body
  • USB 3 (Type-C)

So like to record some happy time videos by Olympus E-M1 Mark II? Want to import the Olympus E-M1 Mark II 4K video to Premiere Pro (CC 2017)? Maybe you will encounter some problems.

How to Solve can't import and edit Olympus E-M1 Mark II 4K video in Premiere Pro (CC 2017)

Granted, Premiere Pro (CC 2017) can handle (usually) Olympus E-M1 Mark II 4K files without much problem, but it is extremely hardware intensive. Thankfully you probably don't have to buy a new computer... but you do need to convert Premiere Pro (CC 2017) video to Premiere Pro using MPEG-2 (1080p) as primary delivery format. The following paragraphs show us how to edit 4K footage with Premiere Pro without bogging down your computer. The process is surprisingly easy and can be done with the help of Pavtube HD Video Converter for Mac.

With it, you can effortlessly encode/re-encode various video including 4K H.264(MP4), XAVC, XAVC S, MTS etc footage for smoothly importing and editing in various non-linear editing systems (NLE), including Adobe Premiere Pro, Avid Media Composer, Final Cut Pro, iMovie, FCE and more. If you work Olympus E-M1 Mark II 4K files in Adobe Premiere Pro on Windows PC, please get Pavtube HD Video Converter to solve the issues.

How to import Olympus E-M1 Mark II 4K video into Adobe Premiere Pro

1. Add video files > Run the program you just set up. Drag and drop the Olympus E-M1 Mark II 4K video files to the converter. You can also hit Add files button to import videos to the app. If you wanna combine several videos into one file, you can click the "Merge into one" box.

2. Choose output format > Click "Format" bar and choose Adobe Premiere/Sony Vegas -> MPEG-2(*.mpg) as output format for editing 4K in Adobe with natively supported video codec.

Tip: Advanced V/A settings > Click "Settings" button if you'd like to customize advanced audio and video parameters like Video Codec, aspect ratio, bit rate, frame rate, Audio codec, sample rate, audio channels. Note: If you want to get original 4K resolution, just keep the video size as original.

Start converting Olympus E-M1 Mark II 4K footage > Hit the convert button of the best 4K Video Converter. It will start converting 4K for importing to Adobe Premiere Pro immediately. Soon after the conversion, just click "Open" button to get the generated files for natively editing in Premiere Pro (CC 2017) perfectly.

Related Articles:

Friday, February 3, 2017

Importing all AVI video to PowerPoint 2016, 2013, 2010, 2007 etc for smooth playing

Audio Video Interleave (AVI) is a file format for storing synchronized video and audio data. Digital cameras commonly use AVI to record video. PowerPoint is a popular presentation software included in the Microsoft Office package. Converting an AVI clip into a PowerPoint file allows you to play the movie during the presentation. Use the PowerPoint program toolbar to insert the AVI file and then save it in the presentation format.

Any AVI to PowerPoint 2016 video converter?

To accomplish the task, you need to seek help from a AVI Video converter that supports the VOB video input and WMV, MPEG-1 output. Here Pavtube Video Converter is highly recommended to help you achieve your task.

The program can help you change almost any popular file format including AVI, VOB, MKV, MOV, MP4, WebM, etc. to PowerPoint compatible video format with fast encoding speed and excellent output quality. After the conversion, you can easily use your movie files in any version of PowerPoint Presentation including PowerPoint 2016, 2013, 2010, 2007, 2003, 2000, 2002, 2005 or even PowerPoint 95, 97. If you're using a Mac, please turn to Pavtube Video Converter for Mac Just get the right version and follow the guide below to convert AVI to PowerPoint supported video formats. Now just get the right version and follow the guide below to convert AVI to PowerPoint supported video formats.

Hot search: MKV video into PowerPointMP4 to PowerPointMP4 to PowerPoint 2016, MPG to PowerPoint

More features of Pavtube Video Converter
Powerful Video Converter: Converts almost every video format to or from H.265 video filess rapidly in high quality.
Wide Selection of Formats Supported: Converts any video files to MKV, AVI, MP4, MOV, 3GP, WMV, and a lot more.
Fast-Speed Video Converter: Converts videos faster than any other video convert software programs.
Lossless Conversion: Convers any video files without the risk of losing its original quality.
Compatible with Windows 10, Windows 8.1, Windows 8, Windows 7, Windows XP.

Free download the AVI to PowerPoint 2016 video converter for Windows

Free download the AVI to PowerPoint 2016 video converter for Mac (Mac version)

Step-by-step-guide to Convert AVI to PowerPoint supported video formats for Playing

Step 1. launch the AVI to PPT converter. Click the Add Files button on the main interface to import AVI files to the app. The AVI Video converter supports batch conversion, so you can add a pile of videos to enjoy the fast conversion speed.

load-files

Step 2. Click on “Format” bar, and Choose PowerPoint compatible format WMV or MPEG-1 from “PowerPoint”.

Tips: For some advances users, you can go to adjust video and audio parameters like bitrate, resolution, channels, etc. Click "Settings" button you can go to check and change them as you like.

Step 3. Press on “Convert” to start encoding AVI Videos to Microsoft PowerPoint Presentation compatible video. When conversion completes, press on “Open” to locate converted videos.

Before starting adding video to PowerPoint, you need to create a folder and put both your converted video and your PowerPoint presentation in this folder. Then open the PowerPoint in this folder to insert the converted video file which is just located in this folder.

Read More:

Source: http://mediaconverting.blogspot.com/2017/02/insert-avi-video-to-powerpoint.html

Tuesday, January 31, 2017

How Do I Convert YouTube video to MP4 on Windows or Mac

If you are a video/movie lover, you may like uploading videos from Youtube. Torrent format also develops good connections between different computers making it possible for people to track each other. Is there any need to convert YouTube to MP4? Yes, there is and top on the list is improved compatibility. With your YouTube files on MP4, you can playback on different platforms and enjoy to the fullest.

Simplest Way to Convert YouTube video Files to MP4

Never overlook Pavtube Video Converter when converting YouTube files to MP4 because it is well suited. To very many people, it’s the best and only solution available for managing the conversion process. There are some unique features that make it standout and you should be on the lookout to enjoy their service. Media browser is one of them and it helps to access all files in the computer for importing to the timeline. Mac user can get Mac version - Pavtube Video Converter for Mac.

Best YouTube to MP4 Video Converter - Pavtube Video Converter

-It supports to convert videos to 150+ video/audio formats, including MP4, AVI, MOV, TOD, WMV, MKV, MOD, DV, HD MOD, WMA, M4B, MP3, M4A, OGG, M4R, WAV, etc.
-With this video converter you can perform basic video editing such as trimming, rotating, splitting, merging, cropping, adjusting brightness, contrast and saturation.
-It is built to convert media files to support different devices like Gear VR, PSP, PS3, PS4, XBOX, Apple TV, TV, Samsung Phones, Android Generic phones, iPhone, iPad, Blackberry LG and other phones.
-It supports Windows XP, Vista, 7, 8, 10 and macOS 10.7 and above to the latest macOS 10.12 Sierra.

Free download the Youtube to MP4 Video Converter

Other Download:
- Pavtube old official address: http://www.pavtube.com/video_converter/
- Cnet Download: http://download.cnet.com/Pavtube-Video-Converter/3000-2194_4-75734821.html
- Softonic Download: http://pavtube-video-converter.en.softonic.com/

Step-by-step Guide on How to Convert YouTube to MP4

Step 1: Import YouTube Files

When you launch the program, click on “Files” and then choose “Add Video” from the menu bar and you will easily add the files that you want to work on. With that option, it’s easy adding multiple files at the same time. There is the easier alternative of dragging and dropping the files.

Step 2: Choose ouput format

Set right output format. Click "Format" bar, and select .mp4 from "Common video" or "HD video" according to your needs.

Step 3: Start Converting YouTube to MP4

There is a button marked “Convert” which you should click to begin the conversion process. It might be very fast if the file is short but if it’s long, you will have to wait for some time.

Read More:

Source: http://mediaconverting.blogspot.com/2017/02/convert-youtube-to-mp4.html